

Showing posts with label Bench Makeover. Show all posts
Showing posts with label Bench Makeover. Show all posts
Monday, May 21, 2012
Meg vs. The Living Room: So far...

Thursday, April 19, 2012
Meg vs. Assorted Unfinished Business: Finishing up
Thursday: Clean up the painting stuff and put the bedroom back together. Put a final coat of paint on the living room bench.
The first half mostly was done because my husband felt bad and did it for me while I was washing a giant mound of dishes at 10pm. The second I did during nap time (the only time I was home before dinner all day!). It is nice to actually have something finished rather than in progress or waiting to be done!
The first half mostly was done because my husband felt bad and did it for me while I was washing a giant mound of dishes at 10pm. The second I did during nap time (the only time I was home before dinner all day!). It is nice to actually have something finished rather than in progress or waiting to be done!
Friday, April 6, 2012
Meg vs. Refinishing: Painting the bench and a little relaxation.
Thursday: Clean out the gutter drain in the front yard.
Friday: Change out the dimmer switch in the master bedroom. Cut up the rest of the branches and put in the shed for fire wood.
Saturday:
Clearly it has been an off week. But for good reason! My in-laws are visiting (well, MIL got here yesterday, FIL will be here tomorrow). I didn't know they were coming when I planned my goals last week. So after doing more cleaning on Wednesday than I have done since we have lived here, I thought I could give myself a bit of a pass and take it easy. We've relaxed, gone to the Jelly Belly Factory, walked by the bay, and the hubs and I even went on a date (shopping for house stuff--we are hopeless romantics!). Still, some things have gotten done. The weed goal was easy because the can was already full, ha ha! I won't be too hung up if we don't finish all the goals this week because tomorrow we have awesome plans like going to the temple, eating out, dying Easter eggs, and doing some consulting with my Pops-in-law about future house projects. If I don't write until Sunday, I haven't been kidnapped, I've just been enjoying! And for your enjoyment, here are a couple of pictures from spray painting my bench today:


After a quick sanding.

After a whole can of primer (clearly I ran out).

After a whole can of paint.
I'll get another can next week so I can add another coat and finish off the parts I missed (the inside of the drawers, the underside of the tabletop, etc. But for not all the visible parts are somewhat presentable. When it is all dry tomorrow I'll take a picture with the pad back on. I am so excited!
Friday, March 23, 2012
Meg vs. The Living Room: DIY Bench Slipcover
Friday: Sew slip cover for living room bench.
I am doubly excited today. First, I made a new slipcover for my bench! All by myself! And second, I actually did it before lunch time. I am posting a good 12 hours before I usually get to it =).
A while back my good friend Emily pinned this tutorial for a DIY bench.

I had no desire to build a bench from scratch, but the cover immediately caught my eye. I had been trying to figure out how to re-upholster this old bench I got on Freecycle. It is just the right size for the space we have, and it also serves as extra seating when we have guests for dinner--we just pull it over to the dining room. But, as you can see, it is not especially attractive.


It is actually a coffee table that the previous owner converted into a bench, and they did not do a particularly neat job on the corners. I didn't want to repeat that mistake. So when I saw this cover, it was like an epiphany--it eliminated the bunchy corner problem, AND I could pull it off and wash it as needed. WHY DIDN'T I THINK OF THAT?! No matter, that is why I have Pinterest; so I don't have to think of things myself.
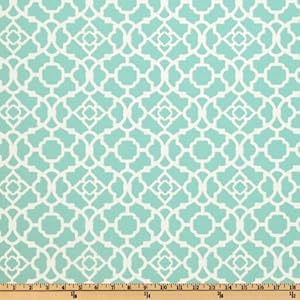
This is the fabric I ordered on Amazon. I love it!

If you scroll down to Step 5 in the bench tutorial, you will find the instructions for sewing the slipcover. I followed them pretty exactly, substituting the measurements for my bench and adding 1/2" on each side to compensate for the seams. My bench was 19 1/2" x 36", so these were the pieces I cut:
Top: 1 piece 20 x 36.5
Long Sides: 2 pieces 36.5 x 8
Short Sides: 2 pieces 20 x 8
(The white edge of the fabric is showing in the picture; I didn't include it in the measurement.)

It was a surprisingly easy project. If you are more proficient/less nervous at sewing, this could easily be done in an hour. After you subtract toddler entertainment/snack breaks, it really didn't take me much longer than that.
Here it is when I fitted it before hemming:
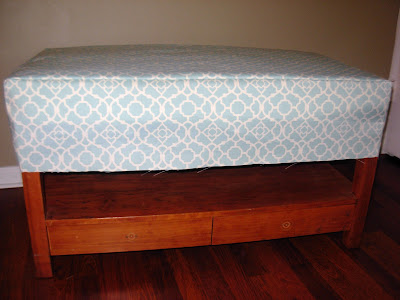
And after hemming:

Ta-Da! This is a super easy way to re-do an existing bench or turn a table into a bench. I can't wait to paint and add some cute hardware to finish this off.

I am doubly excited today. First, I made a new slipcover for my bench! All by myself! And second, I actually did it before lunch time. I am posting a good 12 hours before I usually get to it =).
A while back my good friend Emily pinned this tutorial for a DIY bench.

I had no desire to build a bench from scratch, but the cover immediately caught my eye. I had been trying to figure out how to re-upholster this old bench I got on Freecycle. It is just the right size for the space we have, and it also serves as extra seating when we have guests for dinner--we just pull it over to the dining room. But, as you can see, it is not especially attractive.


It is actually a coffee table that the previous owner converted into a bench, and they did not do a particularly neat job on the corners. I didn't want to repeat that mistake. So when I saw this cover, it was like an epiphany--it eliminated the bunchy corner problem, AND I could pull it off and wash it as needed. WHY DIDN'T I THINK OF THAT?! No matter, that is why I have Pinterest; so I don't have to think of things myself.
This is the fabric I ordered on Amazon. I love it!
If you scroll down to Step 5 in the bench tutorial, you will find the instructions for sewing the slipcover. I followed them pretty exactly, substituting the measurements for my bench and adding 1/2" on each side to compensate for the seams. My bench was 19 1/2" x 36", so these were the pieces I cut:
Top: 1 piece 20 x 36.5
Long Sides: 2 pieces 36.5 x 8
Short Sides: 2 pieces 20 x 8
(The white edge of the fabric is showing in the picture; I didn't include it in the measurement.)

It was a surprisingly easy project. If you are more proficient/less nervous at sewing, this could easily be done in an hour. After you subtract toddler entertainment/snack breaks, it really didn't take me much longer than that.
Here it is when I fitted it before hemming:

And after hemming:

Ta-Da! This is a super easy way to re-do an existing bench or turn a table into a bench. I can't wait to paint and add some cute hardware to finish this off.

Subscribe to:
Posts (Atom)