Showing posts with label Tutorials. Show all posts

Thursday, January 17, 2013

Meg vs. Babies: Cloth Diapers and DIY Cloth Wipes

I have thought on and off about trying cloth diapering ever since we had our first boy. And now that we are on number three and the diapers keep piling up, I finally decided I needed to go for it. It haunted me that we paid so much, threw so much out, and didn't have something sustainable in case of an emergency.

Thankfully, cloth diapers aren't what they used to be. After looking all over for affordable used cloth diapers on Craigslist and elsewhere, I found Alva Baby, which is a Chinese pocket diaper manufacturer (I know, bad American. But I am a poor American, so this is what I can do). Their new diapers are cheaper than almost any used ones I could find here in the bay area, and they had pretty decent reviews. For about $135, I got 20 diapers (they actually ended up sending me 22 for some reason), 40 inserts (20 that came with the diapers, and another 20 more heavy duty liners with bamboo), a roll of liners, and a wet bag for the diaper pail.

They arrived after about a week, and I washed all the covers and inserts with bumGenius Diaper Detergent that I ordered from Amazon (washed the bamboo ones seperately 3 times in hot water to prep them), and was ready to try them on the boys. Since they have snaps to adjust the size, I can use the same batch for both of my boys in diapers.

I was worried about Mr. 2-year-old being resistant to switching up his Huggies, but he thought these bad boys were pretty fancy.


Then I got to thinking, "Why should I keep buying wipes, too?" So I pulled out my stash of flannel receiving blankets, most of which I received as gifts but haven't used because I have big babies and can't keep a good swaddle with them. I cut three of them up into squares (16 squares per blanket), and folded them tissue-style so they would pop out of my wipes container. Here's a quick how-to on that in case you're curious.

1. Lay out a square, like so:


2. Lay another square overlapping half of the first.


3. Fold the first over the second, like so:


4. Lay down a third where the first one was.


5. Fold the second one over the third one (see where this is going?).


6. Repeat until you get a stack like this:


I put a stack of 48 wipes (three blankets' worth) into an extra wipes container, and then went to work on some wipes solution.

I had pinned this solution a long time ago, but on reviewing it, it seemed like it used a LOT of soap for the amount of water it required. Plus in includes baby oil in it, and I read mixed reviews online about whether you should use baby oil with cloth diapers. I also read reviews from people who said just to use water and forget about adding anything. So I took my own approach, boiled two cups of water, added a squirt of the baby wash I had on hand (I think Johnson & Johnson's shea butter something-or-other), and dumped all over my lovely new wipes. Done!


Note: Due to gravity, more solution will sink to the bottom of the stack, making the bottom wipes soggy and the top wipes dry. I would just flip your stack over once a day to redistribute the solution. I do this with my store-bought disposable wipes on occasion as well.

So far they work fine, and it is kind of nice to have something sturdier than my regular wipes between me and whatever mess I am cleaning up (even if I am then throwing it in a laundry bag instead of the trash).

*Update: I realized after a couple of washes that these wipes would fray, since they are flannel (duh, for anyone who sews regularly; I sew not-so-regularly). So as I have pulled them out of the dryer I have been doing a quick zigzag stitch around the edges to prevent more fraying. Otherwise, a few weeks in and I am still happy with them!

One day in, and I would say that the cloth diapers are only marginally more work than disposables (granted, I haven't washed a load yet, but I have a machine that will do all that work for me!). And here is my take on the eww factor: If you are on your first baby and still kind of grossed out by poo, this can seem a little gross, since you may have to do some rinsing (like for my 4-month-old), and you have to pull wet inserts out of covers, dump big poos into the toilet (for my 2-year-old), etc. But after three boys and potty training, the poo part doesn't really bother me, and it is no grosser than cleaning out the training potty we used for my oldest (seriously, for some reason poop is so much grosser in that little potty than in the diaper. Not sure why.). The cloth diapers have done better at containing the newborn poop (we had a blowout pretty much every time he pooped before), which means that I don't have as many clothes to scrub and soak. And the liners in my 2-year-old's diaper minimize the poo interaction there. But to make things easier, I got this Diaper Sprayer on Amazon for $15 (though it looks like it has gone up in price since then), and am planning to hook it up today.

If I change my mind about this whole cloth diapering thing after a couple of weeks I will let you know, but so far I am pretty happy with it!

Monday, November 26, 2012

Meg vs. Christmas: DIY Felt Ornaments

I am just a little excited for the Christmas season. We put up our tree this weekend and the smell is heavenly.

Growing up, we liked to pick a theme or color scheme for the tree each year and do something fancy with it. That is what happens when the girls plan the Christmas decorating. But since we've been married, John has insisted on multicolored lights, a multicolored star, and a variety of multicolored ornaments. I'll admit that I thought it was a bit cheesy at first, and John has since said that I could do the tree how I wanted (though that would require buying all new lights and ornaments, which we can't afford), but our eclectic tree has grown on me.We try to pick up Christmas ornaments to represent the places we've gone and the things we have done together, so decorating the tree is like a walk down memory lane.

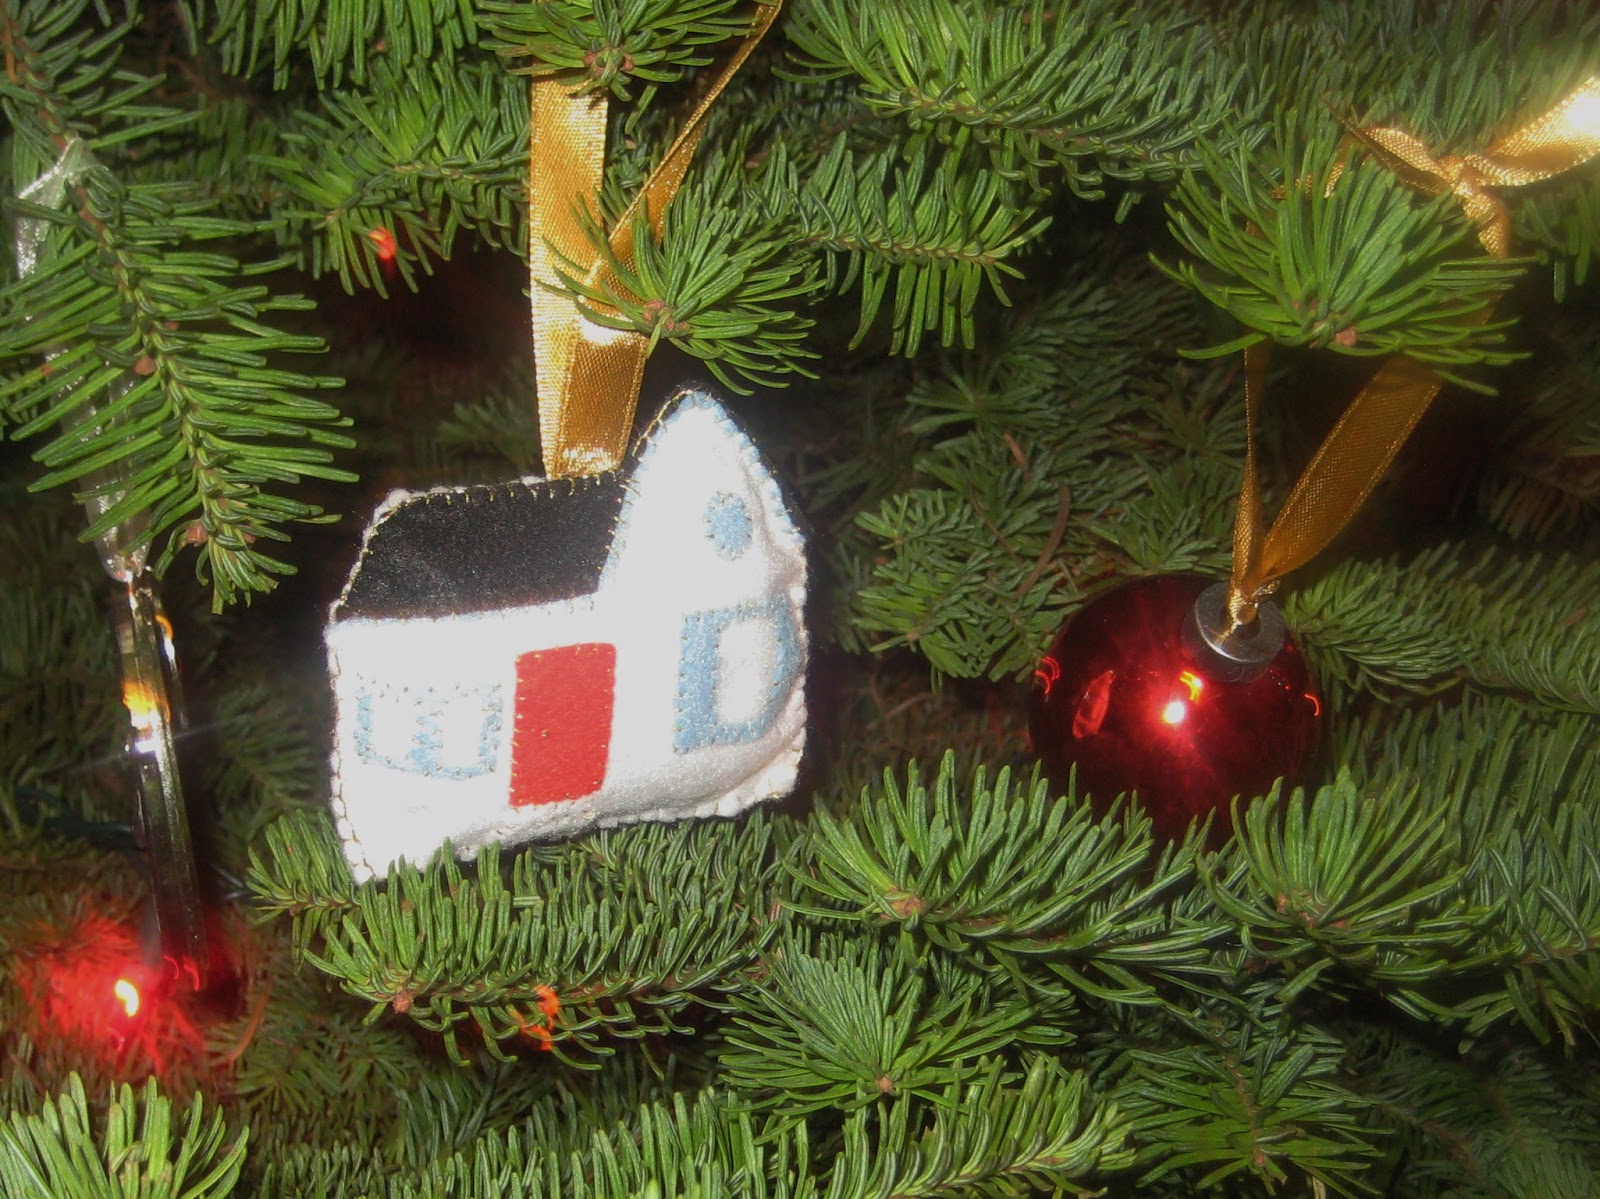
Last year I wanted ornaments to commemorate John starting med school and us buying our house, but couldn't find anything that I liked, let alone that we could afford. So I decided to get crafty in the name of Christmas, and made up some felt ornaments that were exactly what I wanted. They are super easy to make, if a little time consuming. Just cut out two of your chosen shape (one for the front and one for the back). Then cut out the shapes you'll need to adorn your ornament and sew them onto the front. when you are done, use a blanket stitch to attach the front and back pieces together and a hanging ribbon to the top, stopping before you close it all the way to add a little stuffing to give your ornament some dimension. Ta-da!


I used gold thread because I thought it gave the ornaments a more vintage, Christmasey (that is a word, right?) feel. They remind me of my grandmother's old felt ornaments that we had on our tree growing up. On the back of the first ornament, I embroidered (in my sloppy way) "First white coat, 2011," and on the back of the second, "Our first house" and our address.


And as an added bonus, these ornaments are fairly toddler-proof (knock on wood), which is essential in this house. We have already lost three ornaments this year, and the tree has only been decorated for just over 24 hours.

I am already brainstorming what ornaments I will make this year, and I have a few other projects up my sleeve to share here soon.

Friday, November 2, 2012

Meg vs. Halloween: Big Tee to Totoro (or any animal!)


I meant to post this before Halloween, but you know how those things go. In true Japanese form, my kiddos love the movie My Neighbor Totoro . If you haven't seen it, you should! It is so so very cute and fun. A timeless classic.


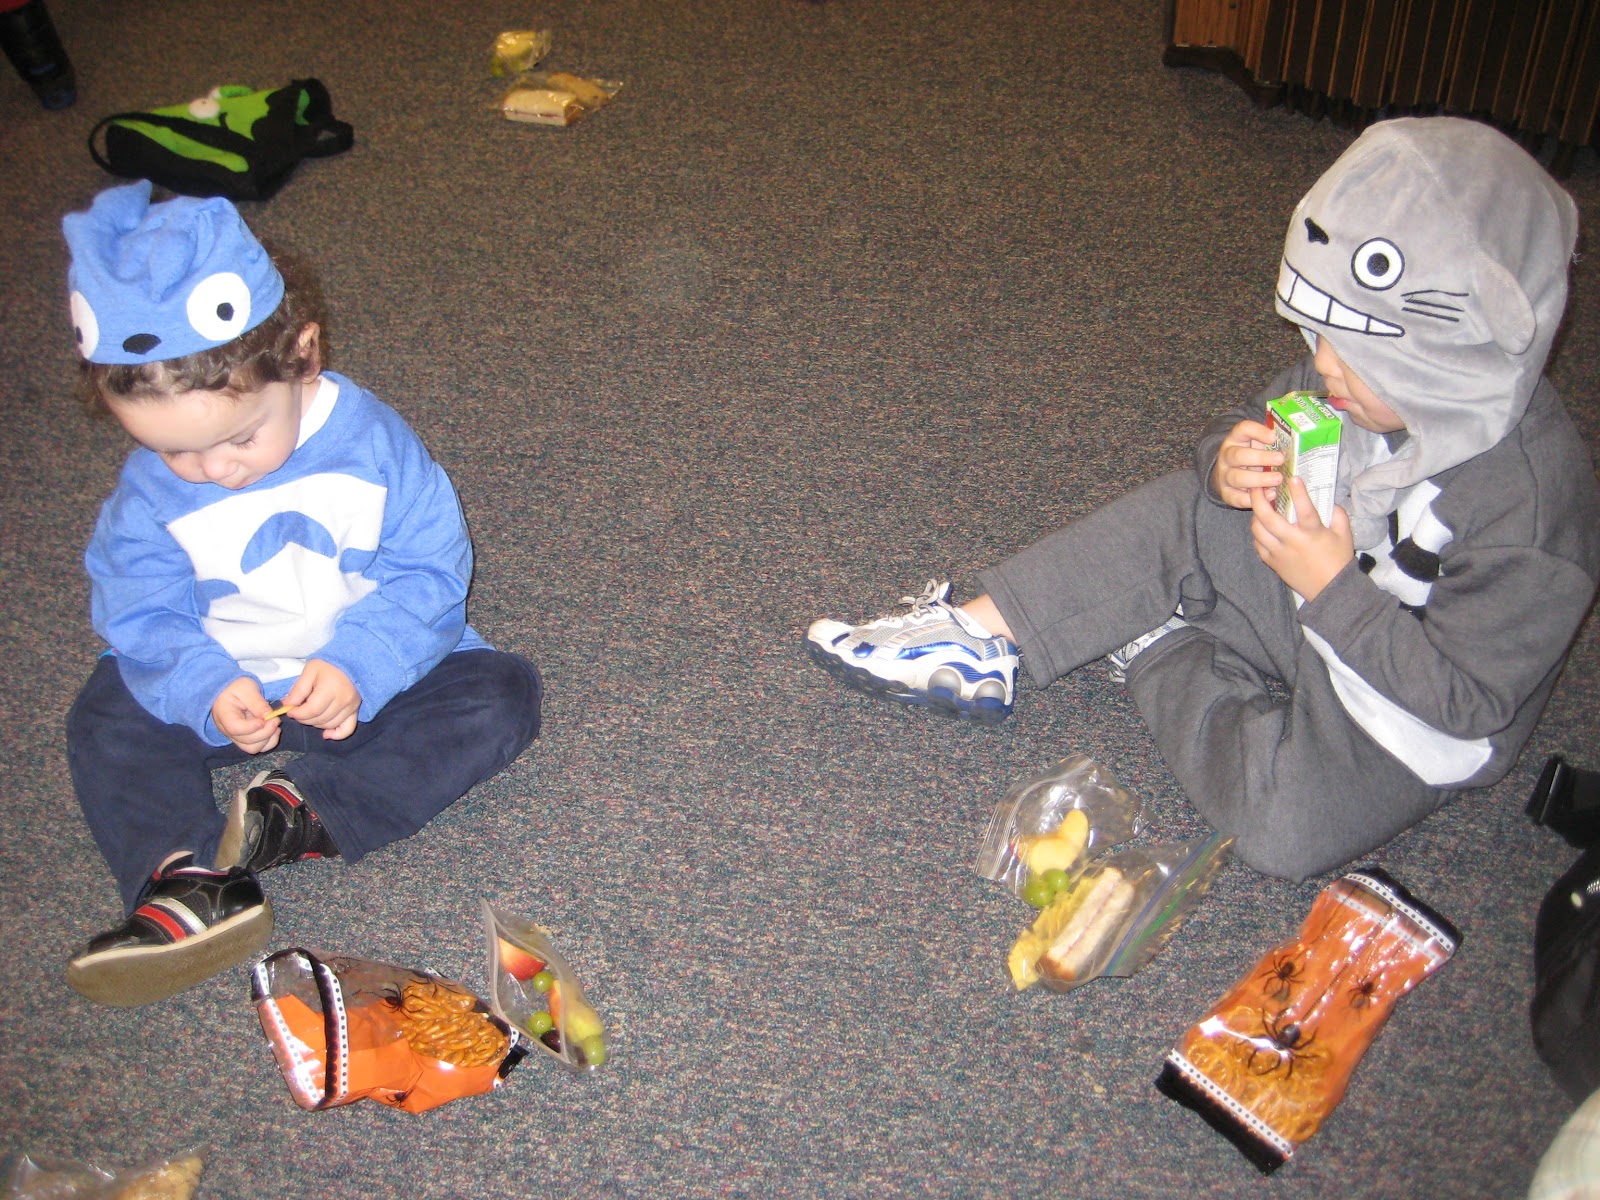
I thought that a Totoro costume would be easy to pull off, and Big Brother already had this Totoro Hat, so I got to work. Big brother was going to be the big grey Totoro, Little Brother would be his little blue friend, and Baby Brother would be a Soot Sprite. Little Brother's costume was the most difficult, because there was no pre-made hat to buy, and I had a hard time finding any plain blue clothing in his size. Finally I came across this boys' XL tee at Wal-Mart, and figured I could work with it.


I wanted it to be a bit big, since I wouldn't have matching pants and the character is kind of round. So I grabbed a hoodie to use for my pattern.

First I cut new, shorter sleeves from the old sleeves.


Next, I folded the hoodie and the shirt in half, laid the hoodie down, and cut around it.


 I laid it all out to make sure the sleeves would fit the curve for the arm holes.

Then I sewed the sleeves back to the shirt, sewed up the sides, and hemmed the bottom.

I had this band from the bottom hem, out of which I cut my hat.


With some felt and a few extra tee shirt scraps, I appliqued on the little Totoro's eyes, nose, and tummy, and I was done! It really was a quick project, and you could easily do any number of animals the same way.


My little fellows were happy with the results! (Even if I did make the hat too small; my kids have really big heads.)


Happy Halloween! On to Thanksgiving fun, then Christmas! Eek!

Wednesday, August 8, 2012

Meg vs. Maternity Wardrobe: Easy skirt updates

In the interest of getting started on my 30 by 30 list, I tackled a couple of maternity skirts that I rarely wore because I didn't like the fit. I knew they were easy fixes if I just took a little time with the sewing machine, but of course I put it off until 2 months before baby is due! Regardless, it is nice to have a little change in my limited maternity wardrobe, and if I can do this, anyone can.

Makeover #1:


(Note the appearance of toys on my bed in the after shots. It was futile trying to keep them out.) This was technically not a maternity skirt, but when I bought it I needed something quick, it had an elastic waistband, and it was on clearance for about $4 at Target; the perfect storm for buying something I didn't really like and that was really the wrong size. Since the waist fit comfortably, I just decided how far in I wanted the bottom of the skirt taken in, pinned it and made sure that I was taking in the same amount on both sides, and sewed a straight line from the waist to the hem. I also took the opportunity to lengthen the skirt a smidge by letting down the original hem as much as possible--a little over an inch. Serious improvement, right? No more saggy, baggy, shapeless blob skirt here.

Makeover #2:


This skirt fit fine, but I was just tired of the shape, and felt like it made me look wider (again, one big, bumpy blob). Plus I had seen lots of maternity pencil skirts and was on the verge of coveting one. This skirt is essentially constructed of a series of triangles, so all I had to do was take in each seam to make the bottom narrower, like this:


Now to tackle the rest of my clothes pile!

Thursday, March 29, 2012

Meg & John vs. The Living Room: DIY floating shelves (with a little help)

I am sorry it took me so long to post about our lovely new shelves. Though I am pretty sure only my mom is anxious to see them =).

I had the idea to do a crown molding knock-off shelf, and found a pretty thorough tutorial on this site. We got excited, bought some inexpensive molding, I took the ugly brackets off our old shelves, and... procrastinated trying to figure out how to cut and attach the molding. Luckily a handy friend of ours was over, took a look at what I had picked up, then took all the shelves home and put them together for us in about an hour. I am positive it would have taken me approximately 17 times that long.

So all we had left was to mount them. We wanted to use the existing plaster mounting thingies (that is the technical term) left from the old shelves, since they were already level and at the right height. The basic plan was to attach a 2x2 (that was cut on an angle on one side to fit inside the molding) directly to the wall, then to attach the floating shelf to that cleat, per the fix-it guy on the tutorial I referenced. I started by following this handy tip and putting toothpaste on each of the holes, then placing the board over the holes so we would know where to drill.


The result:

Next, we used my handy fabric ruler to mark a uniform height on each of our cleats.


We drilled holes in the wood, then screwed each beam to the wall.


I don't have any pictures of the next part, because my awesome husband did it all by himself while I was locked in our room reading Hunger Games. I am such a good wife. In short, you set the shelf on this cleat, then screw the shelf to the cleat through the top of the shelf. John drilled pilot holes in both the shelf and the cleat, drilled a countersink hole in the top of the shelf for the screw to fit into, then attached the shelves to the cleats. Now check out the before and after!


Love love love! The only thing I have to brag about this project is that I have an awesome husband who took a night off from studying even though I was slacking off because he knew how excited I was about getting these shelves fixed up.

Meg vs. The Bedrooms: How to Shorten Blinds

Wednesday: Re-install blinds in the baby room. Shorten the blinds in all the bedrooms.

Today's project was not particularly difficult, but it is rather annoying so I had been putting it off. But it is so nice to have our blinds back up and now at the proper length! Before buying our house I had no idea that you could/would need to shorten blinds. It is just one of those things you don't think about. But as we were walking through, one of our realtors expressed her surprise that they had nice blinds but never bothered to shorten them, since it was so easy. Right then, in an effort to be less tacky than she clearly thought the previous owners were, that went on my mental to-do list for the house. And now, 5 months after we moved in, I finally got around to it!

If you, too, have no idea how to shorten blinds and care to know, here is a quick explanation (please forgive my dirty windows and blinds. I still need to clean pretty much everything in my house):

1. Open your blinds (so the slats are horizontal) and let your blinds down all the way. Take a look at how the blinds hang and how the strings hold them up. Once you get a good idea, the rest should be pretty intuitive.


2. Determine where your lowest slat will be. Then move down and cut the strings halfway between the next slat and the slat after that.


3. Pull out the one slat left below the lowest slat you chose.


4. Pull the little plugs out of the holes on the bottom of the thick base slat. Pull the base slat out.


5. Reposition the thick base slat under your new lowest slat.


Now comes the tricky part.

6. Put the middle string through the hole in the base slat on each side (use tweezers to help pull it through if this is difficult). Once it is through, string a plug onto the end of each string and tie a knot to hold the plug in place.


7. Hold the base slat up against the slat above it, and shove all of the remaining string back up into the hole, then stuff the plug back in to hold it all in place. This is annoying, and hurts my fingers, but once it's done, you're finished. Repeat for all three holes in the bottom of the base. The base slat should sit directly below--pretty much in contact with--the slat above it.


All done, and looking so much better!


Friday, March 16, 2012

Meg vs. The Bathroom: Re-setting the toilet

Friday:  Re-set master toilet on new wax ring. Look under the house to see what the sub-floor looks like.

I have been putting this job off for a long time. No real surprise there, since it involves the toilet and the dank crawl space under the house. But I got to work first thing in the morning cleaning the bathroom and getting ready to do the job.

First I turned off the water to the toilet and drained as much as I could out of the tank and the bowl. I flushed a few times to get as much out as possible, the dumped more water in the bowl with the bucket to get the momentum going out. I managed to get most of the water out, though not all of it.


Next I unscrewed the nuts holding down the toilet and managed to lift the back and move the toilet about a foot forward. At this point I realized that there was no way on earth that I could finish this job without help with lifting, so I just got as far as I could.

The old wax ring was stuck on the ground, so I pried that up, scraped off excess wax, and cleaned around the drain pipe a little bit. The first picture is with the wax seal still on, and the second is right after I pried it off. Both gross. I should have taken a picture after I cleaned a bit, because it was a lot easier to stomach at that point.


After the kids went to bed, the hubby helped me lift up the toilet (at this point the rest of the water came out, which was super fun), and he held it propped on the side of the bath tub while I stuck the wax ring on. It took quite a bit of twisting and pushing to get it to stick on, and even then it fell down onto the drain hole when we brought the toilet down. Perhaps we should have warmed it up a bit with the blow dryer to get it stickier. The box says it should be at least at room temperature to make it malleable.

Once it was in place (as far as we could tell; the directions I read online specifically said not to lift back up once you stick it down, because it will break the seal and you will have to start over again with a new ring), we attached it back to the bolts, re-connected and turned on the water, and waited anxiously.


So far the floor has stayed dry. I think the metal/plastic ring at the top of the floor pipe probably needs replacing too, and depending on the state of the sub-floor we may be ripping up the whole floor this summer anyway, so I will call this good for now. Of course I totally forgot to look under the house until it was dark (And I refuse to stick my head down there in the dark), so I will have to check that tomorrow. But I finally made my first real foray into toilet plumbing, and saved us a good $100 on a plumber. Oh, the fun of owning a house!