Tuesday, January 31, 2012

Meg & John vs. The Living Room: Painting!

I spent the bulk of last week doing painting prep, and and we FINALLY started the real painting tonight! Here was our pre-painting checklist:

  • Take down the shelves with the ugly brackets.
  • Scrub the molding, trim, baseboards, and wainscoting.
  • Patch the multitude of holes all over the walls, the molding, and the trim.
  • Sand the molding, trim, baseboards, and wainscoting.
  • Tape around the baseboards.
  • Paint the molding, trim, and baseboards. Let dry.
  • Tape around the molding.
  • Take the blades off the ceiling fan, then tape a cover over it.
  • Move out all the furniture.
  • Tarp over the floor.
Again, if you don't have two toddlers at home, this probably wouldn't take you a full week. If you do or have had toddlers, you will understand that I'm proud of myself just for having done this and fed them last week.

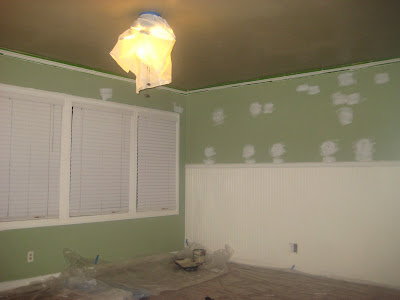
John helped me tonight since I knew I would need help with the ceiling, and I wanted to be sure to get that done before our furniture came (though it should have been here weeks ago, and still no sign of it, so we may have plenty of time left!). Here's tonight's handiwork:


Now I can take the walls one at a time. I am kind of missing the green already even though it's still on all of the walls in the majority of the house. But it was time to move on.

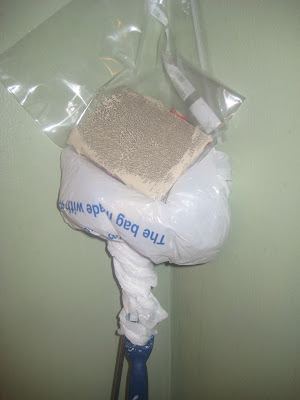
And I'll end with a quick tip. If you dislike washing paint brushes and pads and rollers as much as I do, you'll like this tip:  Don't wash them.


If you're going to use them again soon (within a day or so), stick them in a plastic bag. They'll be fine tomorrow. If it is going to be a few days or more between uses, stick them in the freezer, then defrost an hour or two before using again. We've been doing it for years in my family (a whole legacy of short-cutting!) and it has worked fine for our amateur efforts.

Happy painting!

Saturday, January 28, 2012

Meg vs. The Kitchen: soap dispenser and sponge dish

I did two really simple things to make my (never-ending!) dish washing a little less cumbersome.

1. I peeled the labels off of an old hand sanitizer bottle, washed it out, and filled it with dish soap. Good-bye giant Costco-size bottle on my counter!

2. I got a perfect little oval dish in a sunny color to hold the sponge, to remind me not to leave it in the bottom of the sink, where it gets buried under the dishes and further deters me from doing my least-favorite job. (This habit of mine was also a pet peeve for my husband, so this was a move toward marital harmony on my part.) (I also got six more of these fancy little dishes in blue for making cute little quiches and pot pies and desserts. I love Dollar Tree!)


Simple? Yes.
Live-altering? Yes.
Are the dishes done? Um, no. But they will be =)

Wednesday, January 25, 2012

Meg vs. The Walls: Painting Prep

The last few days I have been working on getting our living room prepped for painting. Our furniture is supposed to come in at the end of the week, and I thought I should at least get the ceiling done before they get here. Here is how the process has gone so far:

Monday: get all excited about painting and buy all the stuff. Put samples up on the wall. Start getting prepped. Go to bed happy.

Tuesday: start filling in holes. Caulk all around the molding. Take down the junky shelves and patch giant holes left behind. 11pm - A little excited, mostly tired.

Wednesday: Sanding. Everything in the world starts annoying me. House looks like a bomb dropped. Whiny children make me feel like my head will literally explode. I need a break. Waste time online, still nowhere near being ready to start painting. The samples on the wall are taunting me.

Tell me I'm not the only person who does this.

Oh, and also still can't find camera charger. I think I shall take a nap and hope that when I wake up, I am excited again.

Saturday, January 21, 2012

Meg vs. The (non-existent) Library: Free Kindle books!

I have been trying harder to do at least some work on a project every day, per my goal. I have three cameras. All three have no battery, and I can't find chargers or batteries for any of them.

Sadly, this is not an unusual state for me. All the more reason to be persistent in getting this house together!

Since I can't take any pictures or share the ones I've already taken, here's something fun.

Have you seen how many free books you can get on Amazon? If you don't have a Kindle or another tablet, you can download Kindle for PC and read on your computer. So awesome.


Here is a sampling of the books I downloaded today:

Fairy Tales Every Child Should Know
Smart School Time Recipes
Organized Simplicity
How to Cook Healthy & Natural Snacks

Also, basically any classic book that is not in copyright (i.e. the author has been deceased for a long time) you can probably find for free on Kindle. I am currently reading Sherlock Holmes, and have Pride & Prejudice and A Journey to the Centre of the Earth in my lineup.

(Lest you think I read more than I do, I may or may not read these by the end of 2012. But getting them feeds my book addiction without using my money or taking up more space in the house I'm trying to de-clutter and organize!)

Yay for free!

Wednesday, January 11, 2012

Meg vs. The Closet: The Dreaded Attic Hole


After some work was done on our house, I found some--gulp--rodent doodie in our closet. It had clearly fallen down from the access hole. I knew I needed to go up and check out the situation to make sure that there wasn't going to be constant doodie rain on whatever I put in that closet, but I kept putting it off. I kind of had an irrational fear that a bunch of spiders or a pack of rodents would jump out and scare me, but enough was enough and I took a lamp up with me today.


Turns out it's just a normal grody old attic, and not a rodent-infested poop-rain one.

But when I got down, Thing 2 had a stinky diaper, so my get-up didn't go unchallenged.

Saturday, January 7, 2012

John vs. Dinner: Hawaiian BBQ

Ever since some friends made it recently, we have been dying for some Hawaiian-style barbecue chicken. Mmm. John was in charge of the chicken, and I am a sucker for roasted pineapple so I was in charge of that. Served with sticky rice. Yum-o!


All of the marinade recipes I looked up had fairly similar elements, but this one had the most authentic-sounding name. =) I found it here. Enjoy!

Kaanapali Alii Original Hawaiian BBQ Chicken Marinade  (Serves 4-6)
  • 4-6 Chicken breasts or chicken thighs
  • 1 1/2 Cup pineapple juice
  • 1 Small can crushed pineapple (including juice)
  • 1/2 Cup brown sugar
  • 3 Tablespoons soy sauce
  • 2 Cloves garlic
  • 1 Fresh whole ginger root (peeled)
  • 1 Sweet Maui onion
  • 1 Tablespoon honey
  • 2 Teaspoons pepper
Directions:
Chop garlic, ginger, and onion.  In a medium bowl combine all ingredients except chickenStir well.  Separate one cup of the marinade into small pot.  Marinate chicken in remaining sauce for a half hour to one hour in the refrigerator.  Heat sauce in pot for 20 minutes over medium heat, stirring occasionally.  Place chicken on grill and cook approximately 10 minutes on each side.  Serve chicken and pour small amount of sauce from pot onto chicken.

We didn't separate the extra sauce; we liked it as-is.

Thursday, January 5, 2012

Meg vs. Boredom: Off-season "candy house"

Post-Christmas special at Michals:  $3


An hour plus of very excited, very entertained toddler that is fun for Mom and Grandma too (not to mention snacks for the next couple of days)?  Priceless.


Tuesday, January 3, 2012

Meg vs. The New Year: Painted closet

This is how I celebrated New Year's Eve (and a few days after that).


Yep, that's a blurry picture of a boring closet.

But that closet was previously dirty (and maybe moldy?) and essentially un-usable, so things that should have gone in there were stacked in our bedroom. I felt like adding a fresh coat of paint and getting rid of all that grodiness was a fitting start to a new year. A good bleach scrubbing, a vinegar scrubbing, a coat of Killz primer (done on New Year's Eve--I told the hubs "Look, I'm primed for a productive year!" He thought that was incredibly witty and marvelled at his luck in having me for a wife. Okay, not really.), and two coats of gloss later, the closet finally looked clean. I am so excited to actually put stuff in it. It's really the little things in life, you know?

Monday, January 2, 2012

Meg vs. Decor: Upcycled Flower Pillows

I got extra crafty this year for Christmas (meaning I did some crafts, since I usually do none). In my family we draw names for Christmas presents, and John and I got my mom and her cousin. So they both got flower pillows. I fell in love with them when I saw these on Pinterest:

They are sold here.

Mine don't look nearly this good, but maybe someday I'll get there.

Here are two of the three that I made:


For both pillows, I purchased sweaters at the thrift store and gave them a good washing. I sewed a straight line from one armpit to the other to create the rectangle pillowcase, then cut off the arms/neck area above the line to use for the flowers. The purple sweater already had a zipper, so I just sewed up the bottom of the sweater and made the side with the zipper the back of the pillow. The green sweater had no zipper, so I purchased a matching one and installed it in the bottom of the sweater (you can see it hanging down).

Obviously I used different techniques for the flowers. The purple sweater was conceptually simpler, but not really much faster to execute. I simply took the arms/neck area, twisted and rolled it to look like a flower, and (rather haphazardly) sewed it down. It had a hood, so I sewed that down to look like a leaf. Because the sweater was pretty heavy, I had to go around all of the rolled edges pretty thoroughly to get the flower to stay down. Some of you who actually know how to sew will probably be able to do this much faster than I did.

For the green pillow, I cut off one of the sleeve cuffs and rolled it up to create the middle of the flower, then cut the rest of the sweater up into petals of various sizes. On the pillow I made for my mom (not shown), I threaded all of the petals onto one thread to hold them together before I sewed them down, but I didn't feel like that made the process any easier, so I don't really think it's worth doing. On this green pillow, I took each petal, scrunched up the bottom, and sewed it onto the pillow, starting with the smallest petals in the middle and working out.

I have some more sweater pillows planned (sans flowers) that I'll share later. All-in-all, I was excited at how these came out for my first attempt.

And if you'd like to see some more pretties, check these out:

Felt flower pillows
Fleece flower pillows
More felt
Even more felt
Fun pom poms

Swoon... sigh... add to checklist under "someday" category.