Clearly this was not today's goal, since today is Friday. But I ended up having a friend's kids over all day, so I thought that cleaning the garage was perhaps not the best idea with between 4 and 6 kids running around at different times of the day. Instead, they all helped me start a few seeds. The kids were excited, the job only took about 5 minutes (just about the length of their attention spans), and everyone was happy. So far we have watermelon, cantaloupe, and corn. I'll do some more as we move further into spring. I am confident that I am capable of killing any and all of them, but for the kids' sakes I hope they grow!

Friday, March 30, 2012
Meg vs. The Garden: Starting seedlings
Saturday: Plant melon seeds in grow trays with the boys.
Clearly this was not today's goal, since today is Friday. But I ended up having a friend's kids over all day, so I thought that cleaning the garage was perhaps not the best idea with between 4 and 6 kids running around at different times of the day. Instead, they all helped me start a few seeds. The kids were excited, the job only took about 5 minutes (just about the length of their attention spans), and everyone was happy. So far we have watermelon, cantaloupe, and corn. I'll do some more as we move further into spring. I am confident that I am capable of killing any and all of them, but for the kids' sakes I hope they grow!
Clearly this was not today's goal, since today is Friday. But I ended up having a friend's kids over all day, so I thought that cleaning the garage was perhaps not the best idea with between 4 and 6 kids running around at different times of the day. Instead, they all helped me start a few seeds. The kids were excited, the job only took about 5 minutes (just about the length of their attention spans), and everyone was happy. So far we have watermelon, cantaloupe, and corn. I'll do some more as we move further into spring. I am confident that I am capable of killing any and all of them, but for the kids' sakes I hope they grow!

Thursday, March 29, 2012
Meg & John vs. The Living Room: DIY floating shelves (with a little help)
I am sorry it took me so long to post about our lovely new shelves. Though I am pretty sure only my mom is anxious to see them =).
I had the idea to do a crown molding knock-off shelf, and found a pretty thorough tutorial on this site. We got excited, bought some inexpensive molding, I took the ugly brackets off our old shelves, and... procrastinated trying to figure out how to cut and attach the molding. Luckily a handy friend of ours was over, took a look at what I had picked up, then took all the shelves home and put them together for us in about an hour. I am positive it would have taken me approximately 17 times that long.
So all we had left was to mount them. We wanted to use the existing plaster mounting thingies (that is the technical term) left from the old shelves, since they were already level and at the right height. The basic plan was to attach a 2x2 (that was cut on an angle on one side to fit inside the molding) directly to the wall, then to attach the floating shelf to that cleat, per the fix-it guy on the tutorial I referenced. I started by following this handy tip and putting toothpaste on each of the holes, then placing the board over the holes so we would know where to drill.

The result:

Next, we used my handy fabric ruler to mark a uniform height on each of our cleats.

We drilled holes in the wood, then screwed each beam to the wall.

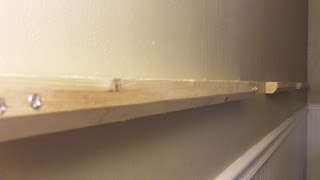
I don't have any pictures of the next part, because my awesome husband did it all by himself while I was locked in our room reading Hunger Games. I am such a good wife. In short, you set the shelf on this cleat, then screw the shelf to the cleat through the top of the shelf. John drilled pilot holes in both the shelf and the cleat, drilled a countersink hole in the top of the shelf for the screw to fit into, then attached the shelves to the cleats. Now check out the before and after!


Love love love! The only thing I have to brag about this project is that I have an awesome husband who took a night off from studying even though I was slacking off because he knew how excited I was about getting these shelves fixed up.
I had the idea to do a crown molding knock-off shelf, and found a pretty thorough tutorial on this site. We got excited, bought some inexpensive molding, I took the ugly brackets off our old shelves, and... procrastinated trying to figure out how to cut and attach the molding. Luckily a handy friend of ours was over, took a look at what I had picked up, then took all the shelves home and put them together for us in about an hour. I am positive it would have taken me approximately 17 times that long.
So all we had left was to mount them. We wanted to use the existing plaster mounting thingies (that is the technical term) left from the old shelves, since they were already level and at the right height. The basic plan was to attach a 2x2 (that was cut on an angle on one side to fit inside the molding) directly to the wall, then to attach the floating shelf to that cleat, per the fix-it guy on the tutorial I referenced. I started by following this handy tip and putting toothpaste on each of the holes, then placing the board over the holes so we would know where to drill.

The result:

Next, we used my handy fabric ruler to mark a uniform height on each of our cleats.

We drilled holes in the wood, then screwed each beam to the wall.


I don't have any pictures of the next part, because my awesome husband did it all by himself while I was locked in our room reading Hunger Games. I am such a good wife. In short, you set the shelf on this cleat, then screw the shelf to the cleat through the top of the shelf. John drilled pilot holes in both the shelf and the cleat, drilled a countersink hole in the top of the shelf for the screw to fit into, then attached the shelves to the cleats. Now check out the before and after!


Love love love! The only thing I have to brag about this project is that I have an awesome husband who took a night off from studying even though I was slacking off because he knew how excited I was about getting these shelves fixed up.
Meg vs. The Living Room: More Stinking Paint!
Thursday: Get paint samples for bedrooms and bathrooms. Scrape damaged paint from living room windows, then prime and paint.
I have to say, I am seriously tired of painting, and I still have about 80% of the house left to go. Blegh. Okay, the complaining is out of my system now.
We painted up our samples in our bedroom last night. We decided we would pick the color for our room, use that same color for the other bedrooms, then get the next darker coordinating color for our bathroom. We are holding off on picking paint for the kids' bathroom until we decide for sure on tile. Here are the samples:

Sorry for the horrible pictures! We chose the one on the left as a safer bet. The one on the right seemed a little dark and almost had a purple tinge to it. The last thing we want is to end up with all purple bedrooms! I am excited for clean, fresh walls if not for actually doing the job.
This afternoon during nap time I got to work on the front windows.


There were two places where the paint was bubbling up, and we were worried about water damage, so I scraped those spots off and took a look: no discernible damage. Yay! I started sanding a bit and was going to go at it with the electric sander to even things out again, when my common-sense alert kicked in: "This is a window on an old house! It isn't unlikely that one of these paint layers has lead! You are pregnant and have two kiddos! What are you doing?"

At this point I did what any experienced homeowner would do: I called my mom. "So, Mom, I think there's a good chance that the place I scraped has lead paint. So I think I should just stop right there and paint back over it." "Yeah, I think you should do that."
So that's what I did. One coat of primer this afternoon, one coat of paint tonight, and another to come before the end of the week. It doesn't look too pretty, but not much worse than the big, bulging, chipping mess that was there before. Maybe sometime I'll have someone else deal with fixing it when the kiddos and me will not be near the premises. I also spent some time touching up all of the trim around the windows. Close inspection revealed that it was in dire need.


Ah, the perilous adventures of scatterbrained me trying to fix our old house!
I have to say, I am seriously tired of painting, and I still have about 80% of the house left to go. Blegh. Okay, the complaining is out of my system now.
We painted up our samples in our bedroom last night. We decided we would pick the color for our room, use that same color for the other bedrooms, then get the next darker coordinating color for our bathroom. We are holding off on picking paint for the kids' bathroom until we decide for sure on tile. Here are the samples:

Sorry for the horrible pictures! We chose the one on the left as a safer bet. The one on the right seemed a little dark and almost had a purple tinge to it. The last thing we want is to end up with all purple bedrooms! I am excited for clean, fresh walls if not for actually doing the job.
This afternoon during nap time I got to work on the front windows.


There were two places where the paint was bubbling up, and we were worried about water damage, so I scraped those spots off and took a look: no discernible damage. Yay! I started sanding a bit and was going to go at it with the electric sander to even things out again, when my common-sense alert kicked in: "This is a window on an old house! It isn't unlikely that one of these paint layers has lead! You are pregnant and have two kiddos! What are you doing?"

At this point I did what any experienced homeowner would do: I called my mom. "So, Mom, I think there's a good chance that the place I scraped has lead paint. So I think I should just stop right there and paint back over it." "Yeah, I think you should do that."
So that's what I did. One coat of primer this afternoon, one coat of paint tonight, and another to come before the end of the week. It doesn't look too pretty, but not much worse than the big, bulging, chipping mess that was there before. Maybe sometime I'll have someone else deal with fixing it when the kiddos and me will not be near the premises. I also spent some time touching up all of the trim around the windows. Close inspection revealed that it was in dire need.


Ah, the perilous adventures of scatterbrained me trying to fix our old house!
Meg vs. The Bedrooms: How to Shorten Blinds
Wednesday: Re-install blinds in the baby room. Shorten the blinds in all the bedrooms.
Today's project was not particularly difficult, but it is rather annoying so I had been putting it off. But it is so nice to have our blinds back up and now at the proper length! Before buying our house I had no idea that you could/would need to shorten blinds. It is just one of those things you don't think about. But as we were walking through, one of our realtors expressed her surprise that they had nice blinds but never bothered to shorten them, since it was so easy. Right then, in an effort to be less tacky than she clearly thought the previous owners were, that went on my mental to-do list for the house. And now, 5 months after we moved in, I finally got around to it!
If you, too, have no idea how to shorten blinds and care to know, here is a quick explanation (please forgive my dirty windows and blinds. I still need to clean pretty much everything in my house):
1. Open your blinds (so the slats are horizontal) and let your blinds down all the way. Take a look at how the blinds hang and how the strings hold them up. Once you get a good idea, the rest should be pretty intuitive.

2. Determine where your lowest slat will be. Then move down and cut the strings halfway between the next slat and the slat after that.

3. Pull out the one slat left below the lowest slat you chose.

4. Pull the little plugs out of the holes on the bottom of the thick base slat. Pull the base slat out.

5. Reposition the thick base slat under your new lowest slat.

Now comes the tricky part.
6. Put the middle string through the hole in the base slat on each side (use tweezers to help pull it through if this is difficult). Once it is through, string a plug onto the end of each string and tie a knot to hold the plug in place.

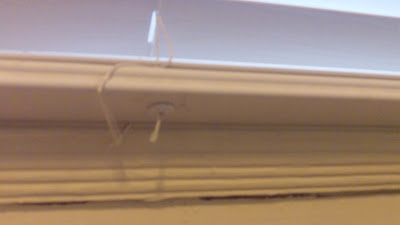
7. Hold the base slat up against the slat above it, and shove all of the remaining string back up into the hole, then stuff the plug back in to hold it all in place. This is annoying, and hurts my fingers, but once it's done, you're finished. Repeat for all three holes in the bottom of the base. The base slat should sit directly below--pretty much in contact with--the slat above it.

All done, and looking so much better!


Today's project was not particularly difficult, but it is rather annoying so I had been putting it off. But it is so nice to have our blinds back up and now at the proper length! Before buying our house I had no idea that you could/would need to shorten blinds. It is just one of those things you don't think about. But as we were walking through, one of our realtors expressed her surprise that they had nice blinds but never bothered to shorten them, since it was so easy. Right then, in an effort to be less tacky than she clearly thought the previous owners were, that went on my mental to-do list for the house. And now, 5 months after we moved in, I finally got around to it!
If you, too, have no idea how to shorten blinds and care to know, here is a quick explanation (please forgive my dirty windows and blinds. I still need to clean pretty much everything in my house):
1. Open your blinds (so the slats are horizontal) and let your blinds down all the way. Take a look at how the blinds hang and how the strings hold them up. Once you get a good idea, the rest should be pretty intuitive.

2. Determine where your lowest slat will be. Then move down and cut the strings halfway between the next slat and the slat after that.

3. Pull out the one slat left below the lowest slat you chose.

4. Pull the little plugs out of the holes on the bottom of the thick base slat. Pull the base slat out.

5. Reposition the thick base slat under your new lowest slat.

Now comes the tricky part.
6. Put the middle string through the hole in the base slat on each side (use tweezers to help pull it through if this is difficult). Once it is through, string a plug onto the end of each string and tie a knot to hold the plug in place.


7. Hold the base slat up against the slat above it, and shove all of the remaining string back up into the hole, then stuff the plug back in to hold it all in place. This is annoying, and hurts my fingers, but once it's done, you're finished. Repeat for all three holes in the bottom of the base. The base slat should sit directly below--pretty much in contact with--the slat above it.

All done, and looking so much better!


Wednesday, March 28, 2012
Meg & John vs. The Bedroom: Ceiling Fan
Tuesday: Put up new ceiling fan in master bedroom.
I really can't take credit for today's mission since John did most of the work (all the hard work). The old fan was a huge, heavy beast to take down. The new fan wasn't any better to put in. It took way too long. Our arms were killing from holding the fan up and putting it together. And we can't even use it yet because we still need to switch the dimmer switch to a regular switch (who hooks up a ceiling fan to a dimmer switch?!?!?!). But it's done, and it looks much better. It will look even more lovely once we paint. And we picked up paint samples today while we were out, so I can cross off another goal for later this week! Yay.
Before:

After:

I really can't take credit for today's mission since John did most of the work (all the hard work). The old fan was a huge, heavy beast to take down. The new fan wasn't any better to put in. It took way too long. Our arms were killing from holding the fan up and putting it together. And we can't even use it yet because we still need to switch the dimmer switch to a regular switch (who hooks up a ceiling fan to a dimmer switch?!?!?!). But it's done, and it looks much better. It will look even more lovely once we paint. And we picked up paint samples today while we were out, so I can cross off another goal for later this week! Yay.
Before:

After:

Monday, March 26, 2012
Meg vs. The Yard: Massive branch clean-up
Monday: Re-fill up the green waste bin. (Read Mockingjay. Heehee.)
Even though I spent the entire morning reading my very addictive book (fun to read, glad it's over), I managed to meet my goal, and even exceed my expectations! When our can was nearly stuffed, our neighbor came over to introduce herself, then offered her green waste bin, which was even bigger than ours! The boys and I spent the entire afternoon in the front yard, and I managed to clean up the ENTIRE giant pile of debris in our driveway. I did leave the bigger branches in the side yard for John to tackle later with the chainsaw, but I was definitely not expecting to get that far.
Aaaaand of course I neglected to take a picture. You win some, you lose some.
Even though I spent the entire morning reading my very addictive book (fun to read, glad it's over), I managed to meet my goal, and even exceed my expectations! When our can was nearly stuffed, our neighbor came over to introduce herself, then offered her green waste bin, which was even bigger than ours! The boys and I spent the entire afternoon in the front yard, and I managed to clean up the ENTIRE giant pile of debris in our driveway. I did leave the bigger branches in the side yard for John to tackle later with the chainsaw, but I was definitely not expecting to get that far.
Aaaaand of course I neglected to take a picture. You win some, you lose some.
Sunday, March 25, 2012
Meg vs. Myself: Weekly goals
Here we are again!
March 19-24
Monday:Sand, fill, and paint shelves for the living room.
Tuesday:Re-fill yard waste bin! Prune roses in the front and plant Dahlias.
Wednesday: Attempt to finally mount shelves.Touch up paint in the living and dining rooms.
Thursday:Go thrifting for a large mirror and other decorations. Buy seeds to start for garden.
Friday:Sew slip cover for living room bench.
Saturday: Change oil in the car.Straighten the garage.
There were a few setbacks in there, but we managed to finish everything! Many thanks to my husband this week, because his services were necessary to get this all done.
March 26-31
Monday: Re-fill up the green waste bin. (Read Mockingjay. Heehee.)
Tuesday: Put up new ceiling fan in master bedroom.
Wednesday: Re-install blinds in the baby room. Shorten the blinds in all the bedrooms.
Thursday: Get paint samples for bedrooms and bathrooms. Scrape damaged paint from living room windows, then prime and paint.
Friday: Organize garage shelves.
Saturday: Plant melon seeds in grow trays with the boys. Watch General Conference!
March 19-24
Monday:
Tuesday:
Wednesday: Attempt to finally mount shelves.
Thursday:
Friday:
Saturday: Change oil in the car.
There were a few setbacks in there, but we managed to finish everything! Many thanks to my husband this week, because his services were necessary to get this all done.
March 26-31
Monday: Re-fill up the green waste bin. (Read Mockingjay. Heehee.)
Tuesday: Put up new ceiling fan in master bedroom.
Wednesday: Re-install blinds in the baby room. Shorten the blinds in all the bedrooms.
Thursday: Get paint samples for bedrooms and bathrooms. Scrape damaged paint from living room windows, then prime and paint.
Friday: Organize garage shelves.
Saturday: Plant melon seeds in grow trays with the boys. Watch General Conference!
Subscribe to:
Posts (Atom)