Clearly this was not today's goal, since today is Friday. But I ended up having a friend's kids over all day, so I thought that cleaning the garage was perhaps not the best idea with between 4 and 6 kids running around at different times of the day. Instead, they all helped me start a few seeds. The kids were excited, the job only took about 5 minutes (just about the length of their attention spans), and everyone was happy. So far we have watermelon, cantaloupe, and corn. I'll do some more as we move further into spring. I am confident that I am capable of killing any and all of them, but for the kids' sakes I hope they grow!

Friday, March 30, 2012
Meg vs. The Garden: Starting seedlings
Saturday: Plant melon seeds in grow trays with the boys.
Clearly this was not today's goal, since today is Friday. But I ended up having a friend's kids over all day, so I thought that cleaning the garage was perhaps not the best idea with between 4 and 6 kids running around at different times of the day. Instead, they all helped me start a few seeds. The kids were excited, the job only took about 5 minutes (just about the length of their attention spans), and everyone was happy. So far we have watermelon, cantaloupe, and corn. I'll do some more as we move further into spring. I am confident that I am capable of killing any and all of them, but for the kids' sakes I hope they grow!
Clearly this was not today's goal, since today is Friday. But I ended up having a friend's kids over all day, so I thought that cleaning the garage was perhaps not the best idea with between 4 and 6 kids running around at different times of the day. Instead, they all helped me start a few seeds. The kids were excited, the job only took about 5 minutes (just about the length of their attention spans), and everyone was happy. So far we have watermelon, cantaloupe, and corn. I'll do some more as we move further into spring. I am confident that I am capable of killing any and all of them, but for the kids' sakes I hope they grow!
Thursday, March 29, 2012
Meg & John vs. The Living Room: DIY floating shelves (with a little help)
I am sorry it took me so long to post about our lovely new shelves. Though I am pretty sure only my mom is anxious to see them =).
I had the idea to do a crown molding knock-off shelf, and found a pretty thorough tutorial on this site. We got excited, bought some inexpensive molding, I took the ugly brackets off our old shelves, and... procrastinated trying to figure out how to cut and attach the molding. Luckily a handy friend of ours was over, took a look at what I had picked up, then took all the shelves home and put them together for us in about an hour. I am positive it would have taken me approximately 17 times that long.
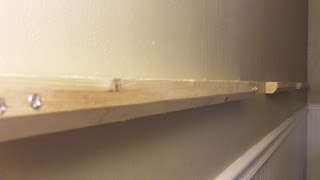
So all we had left was to mount them. We wanted to use the existing plaster mounting thingies (that is the technical term) left from the old shelves, since they were already level and at the right height. The basic plan was to attach a 2x2 (that was cut on an angle on one side to fit inside the molding) directly to the wall, then to attach the floating shelf to that cleat, per the fix-it guy on the tutorial I referenced. I started by following this handy tip and putting toothpaste on each of the holes, then placing the board over the holes so we would know where to drill.

The result:

Next, we used my handy fabric ruler to mark a uniform height on each of our cleats.

We drilled holes in the wood, then screwed each beam to the wall.

I don't have any pictures of the next part, because my awesome husband did it all by himself while I was locked in our room reading Hunger Games. I am such a good wife. In short, you set the shelf on this cleat, then screw the shelf to the cleat through the top of the shelf. John drilled pilot holes in both the shelf and the cleat, drilled a countersink hole in the top of the shelf for the screw to fit into, then attached the shelves to the cleats. Now check out the before and after!


Love love love! The only thing I have to brag about this project is that I have an awesome husband who took a night off from studying even though I was slacking off because he knew how excited I was about getting these shelves fixed up.
I had the idea to do a crown molding knock-off shelf, and found a pretty thorough tutorial on this site. We got excited, bought some inexpensive molding, I took the ugly brackets off our old shelves, and... procrastinated trying to figure out how to cut and attach the molding. Luckily a handy friend of ours was over, took a look at what I had picked up, then took all the shelves home and put them together for us in about an hour. I am positive it would have taken me approximately 17 times that long.
So all we had left was to mount them. We wanted to use the existing plaster mounting thingies (that is the technical term) left from the old shelves, since they were already level and at the right height. The basic plan was to attach a 2x2 (that was cut on an angle on one side to fit inside the molding) directly to the wall, then to attach the floating shelf to that cleat, per the fix-it guy on the tutorial I referenced. I started by following this handy tip and putting toothpaste on each of the holes, then placing the board over the holes so we would know where to drill.

The result:

Next, we used my handy fabric ruler to mark a uniform height on each of our cleats.

We drilled holes in the wood, then screwed each beam to the wall.


I don't have any pictures of the next part, because my awesome husband did it all by himself while I was locked in our room reading Hunger Games. I am such a good wife. In short, you set the shelf on this cleat, then screw the shelf to the cleat through the top of the shelf. John drilled pilot holes in both the shelf and the cleat, drilled a countersink hole in the top of the shelf for the screw to fit into, then attached the shelves to the cleats. Now check out the before and after!


Love love love! The only thing I have to brag about this project is that I have an awesome husband who took a night off from studying even though I was slacking off because he knew how excited I was about getting these shelves fixed up.
Meg vs. The Living Room: More Stinking Paint!
Thursday: Get paint samples for bedrooms and bathrooms. Scrape damaged paint from living room windows, then prime and paint.
I have to say, I am seriously tired of painting, and I still have about 80% of the house left to go. Blegh. Okay, the complaining is out of my system now.
We painted up our samples in our bedroom last night. We decided we would pick the color for our room, use that same color for the other bedrooms, then get the next darker coordinating color for our bathroom. We are holding off on picking paint for the kids' bathroom until we decide for sure on tile. Here are the samples:

Sorry for the horrible pictures! We chose the one on the left as a safer bet. The one on the right seemed a little dark and almost had a purple tinge to it. The last thing we want is to end up with all purple bedrooms! I am excited for clean, fresh walls if not for actually doing the job.
This afternoon during nap time I got to work on the front windows.


There were two places where the paint was bubbling up, and we were worried about water damage, so I scraped those spots off and took a look: no discernible damage. Yay! I started sanding a bit and was going to go at it with the electric sander to even things out again, when my common-sense alert kicked in: "This is a window on an old house! It isn't unlikely that one of these paint layers has lead! You are pregnant and have two kiddos! What are you doing?"

At this point I did what any experienced homeowner would do: I called my mom. "So, Mom, I think there's a good chance that the place I scraped has lead paint. So I think I should just stop right there and paint back over it." "Yeah, I think you should do that."
So that's what I did. One coat of primer this afternoon, one coat of paint tonight, and another to come before the end of the week. It doesn't look too pretty, but not much worse than the big, bulging, chipping mess that was there before. Maybe sometime I'll have someone else deal with fixing it when the kiddos and me will not be near the premises. I also spent some time touching up all of the trim around the windows. Close inspection revealed that it was in dire need.


Ah, the perilous adventures of scatterbrained me trying to fix our old house!
Meg vs. The Bedrooms: How to Shorten Blinds
Wednesday: Re-install blinds in the baby room. Shorten the blinds in all the bedrooms.
Today's project was not particularly difficult, but it is rather annoying so I had been putting it off. But it is so nice to have our blinds back up and now at the proper length! Before buying our house I had no idea that you could/would need to shorten blinds. It is just one of those things you don't think about. But as we were walking through, one of our realtors expressed her surprise that they had nice blinds but never bothered to shorten them, since it was so easy. Right then, in an effort to be less tacky than she clearly thought the previous owners were, that went on my mental to-do list for the house. And now, 5 months after we moved in, I finally got around to it!
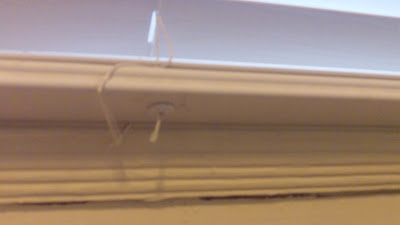
If you, too, have no idea how to shorten blinds and care to know, here is a quick explanation (please forgive my dirty windows and blinds. I still need to clean pretty much everything in my house):
1. Open your blinds (so the slats are horizontal) and let your blinds down all the way. Take a look at how the blinds hang and how the strings hold them up. Once you get a good idea, the rest should be pretty intuitive.

2. Determine where your lowest slat will be. Then move down and cut the strings halfway between the next slat and the slat after that.

3. Pull out the one slat left below the lowest slat you chose.

4. Pull the little plugs out of the holes on the bottom of the thick base slat. Pull the base slat out.

5. Reposition the thick base slat under your new lowest slat.

Now comes the tricky part.
6. Put the middle string through the hole in the base slat on each side (use tweezers to help pull it through if this is difficult). Once it is through, string a plug onto the end of each string and tie a knot to hold the plug in place.

7. Hold the base slat up against the slat above it, and shove all of the remaining string back up into the hole, then stuff the plug back in to hold it all in place. This is annoying, and hurts my fingers, but once it's done, you're finished. Repeat for all three holes in the bottom of the base. The base slat should sit directly below--pretty much in contact with--the slat above it.

All done, and looking so much better!


Today's project was not particularly difficult, but it is rather annoying so I had been putting it off. But it is so nice to have our blinds back up and now at the proper length! Before buying our house I had no idea that you could/would need to shorten blinds. It is just one of those things you don't think about. But as we were walking through, one of our realtors expressed her surprise that they had nice blinds but never bothered to shorten them, since it was so easy. Right then, in an effort to be less tacky than she clearly thought the previous owners were, that went on my mental to-do list for the house. And now, 5 months after we moved in, I finally got around to it!
If you, too, have no idea how to shorten blinds and care to know, here is a quick explanation (please forgive my dirty windows and blinds. I still need to clean pretty much everything in my house):
1. Open your blinds (so the slats are horizontal) and let your blinds down all the way. Take a look at how the blinds hang and how the strings hold them up. Once you get a good idea, the rest should be pretty intuitive.

2. Determine where your lowest slat will be. Then move down and cut the strings halfway between the next slat and the slat after that.

3. Pull out the one slat left below the lowest slat you chose.

4. Pull the little plugs out of the holes on the bottom of the thick base slat. Pull the base slat out.

5. Reposition the thick base slat under your new lowest slat.

Now comes the tricky part.
6. Put the middle string through the hole in the base slat on each side (use tweezers to help pull it through if this is difficult). Once it is through, string a plug onto the end of each string and tie a knot to hold the plug in place.


7. Hold the base slat up against the slat above it, and shove all of the remaining string back up into the hole, then stuff the plug back in to hold it all in place. This is annoying, and hurts my fingers, but once it's done, you're finished. Repeat for all three holes in the bottom of the base. The base slat should sit directly below--pretty much in contact with--the slat above it.

All done, and looking so much better!


Wednesday, March 28, 2012
Meg & John vs. The Bedroom: Ceiling Fan
Tuesday: Put up new ceiling fan in master bedroom.
I really can't take credit for today's mission since John did most of the work (all the hard work). The old fan was a huge, heavy beast to take down. The new fan wasn't any better to put in. It took way too long. Our arms were killing from holding the fan up and putting it together. And we can't even use it yet because we still need to switch the dimmer switch to a regular switch (who hooks up a ceiling fan to a dimmer switch?!?!?!). But it's done, and it looks much better. It will look even more lovely once we paint. And we picked up paint samples today while we were out, so I can cross off another goal for later this week! Yay.
Before:

After:

Monday, March 26, 2012
Meg vs. The Yard: Massive branch clean-up
Monday: Re-fill up the green waste bin. (Read Mockingjay. Heehee.)
Even though I spent the entire morning reading my very addictive book (fun to read, glad it's over), I managed to meet my goal, and even exceed my expectations! When our can was nearly stuffed, our neighbor came over to introduce herself, then offered her green waste bin, which was even bigger than ours! The boys and I spent the entire afternoon in the front yard, and I managed to clean up the ENTIRE giant pile of debris in our driveway. I did leave the bigger branches in the side yard for John to tackle later with the chainsaw, but I was definitely not expecting to get that far.
Aaaaand of course I neglected to take a picture. You win some, you lose some.
Sunday, March 25, 2012
Meg vs. Myself: Weekly goals
Here we are again!
March 19-24
Monday:Sand, fill, and paint shelves for the living room.
Tuesday:Re-fill yard waste bin! Prune roses in the front and plant Dahlias.
Wednesday: Attempt to finally mount shelves.Touch up paint in the living and dining rooms.
Thursday:Go thrifting for a large mirror and other decorations. Buy seeds to start for garden.
Friday:Sew slip cover for living room bench.
Saturday: Change oil in the car.Straighten the garage.
There were a few setbacks in there, but we managed to finish everything! Many thanks to my husband this week, because his services were necessary to get this all done.
March 26-31
Monday: Re-fill up the green waste bin. (Read Mockingjay. Heehee.)
Tuesday: Put up new ceiling fan in master bedroom.
Wednesday: Re-install blinds in the baby room. Shorten the blinds in all the bedrooms.
Thursday: Get paint samples for bedrooms and bathrooms. Scrape damaged paint from living room windows, then prime and paint.
Friday: Organize garage shelves.
Saturday: Plant melon seeds in grow trays with the boys. Watch General Conference!
March 19-24
Monday:
Tuesday:
Wednesday: Attempt to finally mount shelves.
Thursday:
Friday:
Saturday: Change oil in the car.
There were a few setbacks in there, but we managed to finish everything! Many thanks to my husband this week, because his services were necessary to get this all done.
March 26-31
Monday: Re-fill up the green waste bin. (Read Mockingjay. Heehee.)
Tuesday: Put up new ceiling fan in master bedroom.
Wednesday: Re-install blinds in the baby room. Shorten the blinds in all the bedrooms.
Thursday: Get paint samples for bedrooms and bathrooms. Scrape damaged paint from living room windows, then prime and paint.
Friday: Organize garage shelves.
Saturday: Plant melon seeds in grow trays with the boys. Watch General Conference!
Meg vs. The Living Room: Shelves!
Saturday: Change oil in the car. Straighten the garage.
It was raining and we were unexpectedly busy today. Ergo no oil change... onto next week docket it goes! BUT my awesome hubby spent a good part of the day (When he should have been studying) putting up the living room shelves! And they look awesome!
The only bad part is that my back-up camera is now non-functional, and my back-up back-up is lost (had it earlier, pretty sure the kiddos hid it). So photos will have to wait. Boo. I will have to go look at my new shelves to cheer myself up.
Friday, March 23, 2012
Meg vs. The Living Room: DIY Bench Slipcover
Friday: Sew slip cover for living room bench.
I am doubly excited today. First, I made a new slipcover for my bench! All by myself! And second, I actually did it before lunch time. I am posting a good 12 hours before I usually get to it =).
A while back my good friend Emily pinned this tutorial for a DIY bench.

I had no desire to build a bench from scratch, but the cover immediately caught my eye. I had been trying to figure out how to re-upholster this old bench I got on Freecycle. It is just the right size for the space we have, and it also serves as extra seating when we have guests for dinner--we just pull it over to the dining room. But, as you can see, it is not especially attractive.


It is actually a coffee table that the previous owner converted into a bench, and they did not do a particularly neat job on the corners. I didn't want to repeat that mistake. So when I saw this cover, it was like an epiphany--it eliminated the bunchy corner problem, AND I could pull it off and wash it as needed. WHY DIDN'T I THINK OF THAT?! No matter, that is why I have Pinterest; so I don't have to think of things myself.
This is the fabric I ordered on Amazon. I love it!

If you scroll down to Step 5 in the bench tutorial, you will find the instructions for sewing the slipcover. I followed them pretty exactly, substituting the measurements for my bench and adding 1/2" on each side to compensate for the seams. My bench was 19 1/2" x 36", so these were the pieces I cut:
Top: 1 piece 20 x 36.5
Long Sides: 2 pieces 36.5 x 8
Short Sides: 2 pieces 20 x 8
(The white edge of the fabric is showing in the picture; I didn't include it in the measurement.)

It was a surprisingly easy project. If you are more proficient/less nervous at sewing, this could easily be done in an hour. After you subtract toddler entertainment/snack breaks, it really didn't take me much longer than that.
Here it is when I fitted it before hemming:
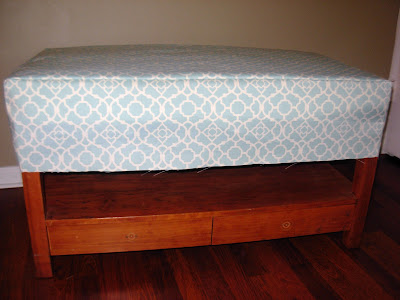
And after hemming:

Ta-Da! This is a super easy way to re-do an existing bench or turn a table into a bench. I can't wait to paint and add some cute hardware to finish this off.

I am doubly excited today. First, I made a new slipcover for my bench! All by myself! And second, I actually did it before lunch time. I am posting a good 12 hours before I usually get to it =).
A while back my good friend Emily pinned this tutorial for a DIY bench.
I had no desire to build a bench from scratch, but the cover immediately caught my eye. I had been trying to figure out how to re-upholster this old bench I got on Freecycle. It is just the right size for the space we have, and it also serves as extra seating when we have guests for dinner--we just pull it over to the dining room. But, as you can see, it is not especially attractive.


It is actually a coffee table that the previous owner converted into a bench, and they did not do a particularly neat job on the corners. I didn't want to repeat that mistake. So when I saw this cover, it was like an epiphany--it eliminated the bunchy corner problem, AND I could pull it off and wash it as needed. WHY DIDN'T I THINK OF THAT?! No matter, that is why I have Pinterest; so I don't have to think of things myself.
This is the fabric I ordered on Amazon. I love it!
If you scroll down to Step 5 in the bench tutorial, you will find the instructions for sewing the slipcover. I followed them pretty exactly, substituting the measurements for my bench and adding 1/2" on each side to compensate for the seams. My bench was 19 1/2" x 36", so these were the pieces I cut:
Top: 1 piece 20 x 36.5
Long Sides: 2 pieces 36.5 x 8
Short Sides: 2 pieces 20 x 8
(The white edge of the fabric is showing in the picture; I didn't include it in the measurement.)

It was a surprisingly easy project. If you are more proficient/less nervous at sewing, this could easily be done in an hour. After you subtract toddler entertainment/snack breaks, it really didn't take me much longer than that.
Here it is when I fitted it before hemming:

And after hemming:

Ta-Da! This is a super easy way to re-do an existing bench or turn a table into a bench. I can't wait to paint and add some cute hardware to finish this off.

Thursday, March 22, 2012
Meg vs. Decor and the Garden: Shopping!
Thursday: Go thrifting for a large mirror and other decorations. Buy seeds to start for garden.
This seems like it would be an easy goal for a day, but it means either dragging two toddlers shopping all over the place or figuring out how to leave them at home. Lucky for me, John had the day off.
We all took a trip to Home Depot in the morning. We picked up a ceiling fan for our room, looked at bathroom fans (we ended up ordering on Amazon), and I grabbed a whole pile of seeds as fast as I could since by then the kiddos were DONE.

I was able to escape during nap time to do my thrifting. Sadly, I found no mirror to my liking. All the thrift mirrors were surprisingly pricey and not particularly attractive. I could get the same thing for the same price new at Ross. We want something with some visual interest, perhaps round or oval to offset all the straight lines and right angles in the room. And perhaps something I can paint a bright color to wake things up a bit. But nothing yet.
What I did find (at Ross; I was getting desperate, and it was next to Goodwill) was a king size sheet set in the same pattern (though a slightly different color) as my bench fabric. I think they will make fine drapes and accents for the living room.

Wednesday, March 21, 2012
Meg vs. The Living Room: Still no shelves.
Wednesday: Attempt to finally mount shelves. Touch up paint in the living and dining rooms.
I did myself a kindness and did the second half of today's goal on Monday. And it was extra nice because I STILL didn't get the shelves done! They are a serious Achilles' heel. I am convinced that when we finally get them up they are going to cause the wall to crack open or they will fall and destroy all my frames. Am I the only one that has these kind of DIY anxiety nightmares?
Back to why our walls are still shelf-less. I got a message last night saying that our windows came in early and the installers wanted to come first thing this morning. Awesome! Of course I called back and said yes, then slapped another coat of paint on my shelves, did a few other things, and crashed into bed, telling myself I would get up early to finish up what needed to be done for the window guys. Somehow I did not notice that the whole house was a disaster.
When I woke up and realized the extent of the mess, I got to work and dragged John out of bed (on his day off!) to take down all of the blinds. We were mostly done when the installer arrived at about 8:15 a.m. We did some necessary shopping in the morning, then I went to the temple during nap time since we couldn't do much with the installers working all day and John had some free time to watch the boys. When I got back we marked the wood for the shelves and charged the drill, then the boys got anxious for dinner, the missionaries called and needed some help from my husband, and I realized I was going to have to put the blinds back up by myself before bed time. So long, goal!
But again, we had a great day and I'll call it good. New windows, some necessary rejuvenation, and 1/5 of that stinking shelf project done! I am learning not to expect too much of myself; it is just as bad as expecting too little, and ends up with the same result--I am less effective.

Tuesday, March 20, 2012
Meg vs. The Yard: Pruning, planting, catching up.
Tuesday: Re-fill yard waste bin! Prune roses in the front and plant Dahlias.
As I mentioned yesterday, the first goal wasn't too tough because our green waste bin was not emptied yesterday as it should have been. Ah, life.
With no place to put my spiny rose cuttings, I thought the better of trying to prune my bushes with the boys around. Instead I pulled a whole bunch more sourgrass that was matting my planters, uncovered some new plants that sprung up during the rain (get ready for a new game of name that plant!), tried to un-ensnare the rose bushes in our side yard from the ivy that was attacking it, and did, in fact, plant the Dahlias.
With the rest of the day I decided to play a little bit of catch-up; cleaning, laundry, etc. etc. I even managed a shower during daylight hours =).
And the best part of all is that John's hardest exam of the semester is over and now he has three days off, so we went out to eat and I didn't even have to make dinner! Some days are just awesome, even if I can't prune my roses.
Meg vs. The Living Room: Touch-up paint and painted shelves
Monday: Sand, fill, and paint shelves for the living room.
I tried to start on the shelves during "nap time," but my kids didn't cooperate with my well-laid plans, so I quickly filled a couple of holes and then ran back inside to the child presently making a ruckus.
Instead I decided to start on Wednesday's goal of touching up the paint, since it was mostly in places out of little ones' reach and was something I could do while watching the boys, and also do in little spurts without too much consequence on the results. But once the perfectionist goggles were on, the places I wanted to fix just kept popping up. There were a lot of places where the molding wasn't really straight, so the straight tape lines actually left little gaps in between the paint and the molding. You really can't tell much of a difference here, but it was just noticeable to be really annoying. Finally at just before 11pm I finally decided it was good enough.

All touched up and ready for shelves!

After a glass of water and an ice cream sundae, I forced myself out to the garage to squeeze in as much work on the shelves as I could manage before I collapsed in exhaustion. I finished a little sanding, wiped them down, and slapped a coat of paint on each one. Now two shelves have one coat and one shelf has two. They'll all need another coat or two tomorrow, but I will call today's mission accomplished.

I am already behind on tomorrow's goal because even though we put the can out at 6:30 a.m., apparently we missed the green waste truck. I am seriously tempted to ask my neighbors if I can borrow theirs, because not a single other person has had theirs out in the last few weeks. Alas, I feel too guilty making that my first real acquaintance with these people... Here's to another week with the giant tree branch in our driveway!
Sunday, March 18, 2012
Meg vs. Myself: Weekly Goals
I was pretty solid through the week until Saturday. I didn't successfully complete a replacement goal after my fabric didn't come, but I did at least finish up Friday's job.
March 12-17 - Preparedness week! (Not at all influenced by the fact that we've had3 4 earthquakes in the last few weeks.)
Monday:Clear a place and plant the boysenberries.
Tuesday:Plan 72-hour kits, make a shopping list, order supplies online, gather things we already have.
Wednesday:Buy supplies for 72-hour kits at the Dollar Store and start sorting supplies into baggies.
Thursday:Buy any additional supplies for 72-hour kits and finish putting them together.
Friday:Re-set master toilet on new wax ring. Look under the house to see what the sub-floor looks like.
Saturday: Sew slip cover for living room bench.
Hubby has a couple of days off at the end of this week, so that might help me stay on track (and maybe even clean my house!) this week, but I always forget how much he still needs to study even when classes aren't in session. But here are what I consider to be some rather ambitious goals:
March 19-24
Monday: Sand, fill, and paint shelves for the living room.
Tuesday: Re-fill yard waste bin! Prune roses in the front and plant Dahlias.
Wednesday: Attempt to finally mount shelves. Touch up paint in the living and dining rooms.
Thursday: Go thrifting for a large mirror and other decorations. Buy seeds to start for garden.
Friday: Sew slip cover for living room bench.
Saturday: Change oil in the car. Straighten the garage.
March 12-17 - Preparedness week! (Not at all influenced by the fact that we've had
Monday:
Tuesday:
Wednesday:
Thursday:
Friday:
Saturday: Sew slip cover for living room bench.
Hubby has a couple of days off at the end of this week, so that might help me stay on track (and maybe even clean my house!) this week, but I always forget how much he still needs to study even when classes aren't in session. But here are what I consider to be some rather ambitious goals:
March 19-24
Monday: Sand, fill, and paint shelves for the living room.
Tuesday: Re-fill yard waste bin! Prune roses in the front and plant Dahlias.
Wednesday: Attempt to finally mount shelves. Touch up paint in the living and dining rooms.
Thursday: Go thrifting for a large mirror and other decorations. Buy seeds to start for garden.
Friday: Sew slip cover for living room bench.
Saturday: Change oil in the car. Straighten the garage.
Meg vs. The Bathroom: A peek under the house
Saturday: Fun time! Sew slipcover for the living room bench.
Bad news again. My fabric didn't arrive. So.... this gets moved to next week, and we do something different. AGAIN!
So I started by playing catch-up on yesterday's goals. I pulled up the panel in our closet floor, crouched down inside, and looked at the bathroom sub-floor. This is what I saw:


If you can determine anything from these pictures, feel free to let me know. Looks like beams and insulation to me. So I decided to go back and look at our inspection reports. That is a good way to stress myself out, because it reminds me how much we have to do, and how many things could potentially go wrong with our house. My dream house used to be an old charming one. Now it is a brand new one with a warranty =).
Anyhow, here is what the report says:

My uncle took a look while he was here and said the floor didn't feel like there was really significant damage. But the all of the grout is crusty and eroding, so I think I'll consult with my father-in-law when they come visit at some point and we'll see how much of this we can address. Until then, I am calling my new wax ring and peek under the house a job well done =).
I also had planned to touch up the paint in the living room, but John was off studying, the boys took extra long to go to bed, and I unwisely started reading Pride & Prejudice... so we'll have to save that for another day.
Bad news again. My fabric didn't arrive. So.... this gets moved to next week, and we do something different. AGAIN!
So I started by playing catch-up on yesterday's goals. I pulled up the panel in our closet floor, crouched down inside, and looked at the bathroom sub-floor. This is what I saw:


If you can determine anything from these pictures, feel free to let me know. Looks like beams and insulation to me. So I decided to go back and look at our inspection reports. That is a good way to stress myself out, because it reminds me how much we have to do, and how many things could potentially go wrong with our house. My dream house used to be an old charming one. Now it is a brand new one with a warranty =).
Anyhow, here is what the report says:
My uncle took a look while he was here and said the floor didn't feel like there was really significant damage. But the all of the grout is crusty and eroding, so I think I'll consult with my father-in-law when they come visit at some point and we'll see how much of this we can address. Until then, I am calling my new wax ring and peek under the house a job well done =).
I also had planned to touch up the paint in the living room, but John was off studying, the boys took extra long to go to bed, and I unwisely started reading Pride & Prejudice... so we'll have to save that for another day.
Friday, March 16, 2012
Meg vs. The Bathroom: Re-setting the toilet
Friday: Re-set master toilet on new wax ring. Look under the house to see what the sub-floor looks like.
I have been putting this job off for a long time. No real surprise there, since it involves the toilet and the dank crawl space under the house. But I got to work first thing in the morning cleaning the bathroom and getting ready to do the job.
First I turned off the water to the toilet and drained as much as I could out of the tank and the bowl. I flushed a few times to get as much out as possible, the dumped more water in the bowl with the bucket to get the momentum going out. I managed to get most of the water out, though not all of it.

Next I unscrewed the nuts holding down the toilet and managed to lift the back and move the toilet about a foot forward. At this point I realized that there was no way on earth that I could finish this job without help with lifting, so I just got as far as I could.
The old wax ring was stuck on the ground, so I pried that up, scraped off excess wax, and cleaned around the drain pipe a little bit. The first picture is with the wax seal still on, and the second is right after I pried it off. Both gross. I should have taken a picture after I cleaned a bit, because it was a lot easier to stomach at that point.


After the kids went to bed, the hubby helped me lift up the toilet (at this point the rest of the water came out, which was super fun), and he held it propped on the side of the bath tub while I stuck the wax ring on. It took quite a bit of twisting and pushing to get it to stick on, and even then it fell down onto the drain hole when we brought the toilet down. Perhaps we should have warmed it up a bit with the blow dryer to get it stickier. The box says it should be at least at room temperature to make it malleable.
Once it was in place (as far as we could tell; the directions I read online specifically said not to lift back up once you stick it down, because it will break the seal and you will have to start over again with a new ring), we attached it back to the bolts, re-connected and turned on the water, and waited anxiously.

So far the floor has stayed dry. I think the metal/plastic ring at the top of the floor pipe probably needs replacing too, and depending on the state of the sub-floor we may be ripping up the whole floor this summer anyway, so I will call this good for now. Of course I totally forgot to look under the house until it was dark (And I refuse to stick my head down there in the dark), so I will have to check that tomorrow. But I finally made my first real foray into toilet plumbing, and saved us a good $100 on a plumber. Oh, the fun of owning a house!
Meg vs. Preparation: More 72-hour kits!
Thursday: Shopping day! Buy any additional supplies for 72-hour kits and finish putting them together.
I did this as much as was possible today. My Amazon order still isn't here, and the kits are still very very basic, but they are started and I think we could survive with them even if they aren't ideal.
I only had about an hour and a half round trip to do my shopping this morning. The road to WalMart was ridiculously crowded, so I changed course and headed to Target. I probably ended up spending a little more there, but a girl's got to do what a girl's got to do. Plus shopping at Target is significantly more pleasant than the alternative.
I found some little kiddy backpacks on clearance for $7.68, which was perfect for the boys and baby #3 (I think everyone who reads this should know by now, especially with my last post. But if not, surprise!). Here is what I put together:

Each person got two food bags; one for meals, one for snacks. Breakfasts: 5 oatmeal packets. Lunches: One easy mac, two tuna packets. Dinner: Three cans. The only differences between the kids and adults are that the adults got chile instead of ravioli, and the kids got Cliff Kidz Bars that I got on clearance instead of full size ones.

Kids' miscellaneous bags: Toothbrush/paste, tissue, notepad, sunscreen, comb, hand sanitizer, mask, washcloth, map with important addresses and phone numbers.

It all just barely fit with a change of clothes and a roll of toilet paper. We will have to pack a separate bag with diapers and wipes for everyone.

And this is everything that baby #3 has so far. Toothbrush, washcloth, notepad (it was extra), juice (in case of dehydration). We'll work on that pack later.

For now I filled the rest with extra water and an activity for big brothers.

Here is my miscellaneous bag. It has meds for the family, sewing kit, aloe gel, a lighter, and can opener (all from the dollar store!) in addition to what the kids have. Hubby has the same one minus the meds, since he'll be getting the giant first aid kit in his bag.

Here is hubby's bag.

And here they are all packed up!

In our front closet, ready to go out the door.

I'll keep building them little by little, but it feels good to have something. Bring it on, nature. (No, just kidding. Please don't.)
I did this as much as was possible today. My Amazon order still isn't here, and the kits are still very very basic, but they are started and I think we could survive with them even if they aren't ideal.
I only had about an hour and a half round trip to do my shopping this morning. The road to WalMart was ridiculously crowded, so I changed course and headed to Target. I probably ended up spending a little more there, but a girl's got to do what a girl's got to do. Plus shopping at Target is significantly more pleasant than the alternative.
I found some little kiddy backpacks on clearance for $7.68, which was perfect for the boys and baby #3 (I think everyone who reads this should know by now, especially with my last post. But if not, surprise!). Here is what I put together:
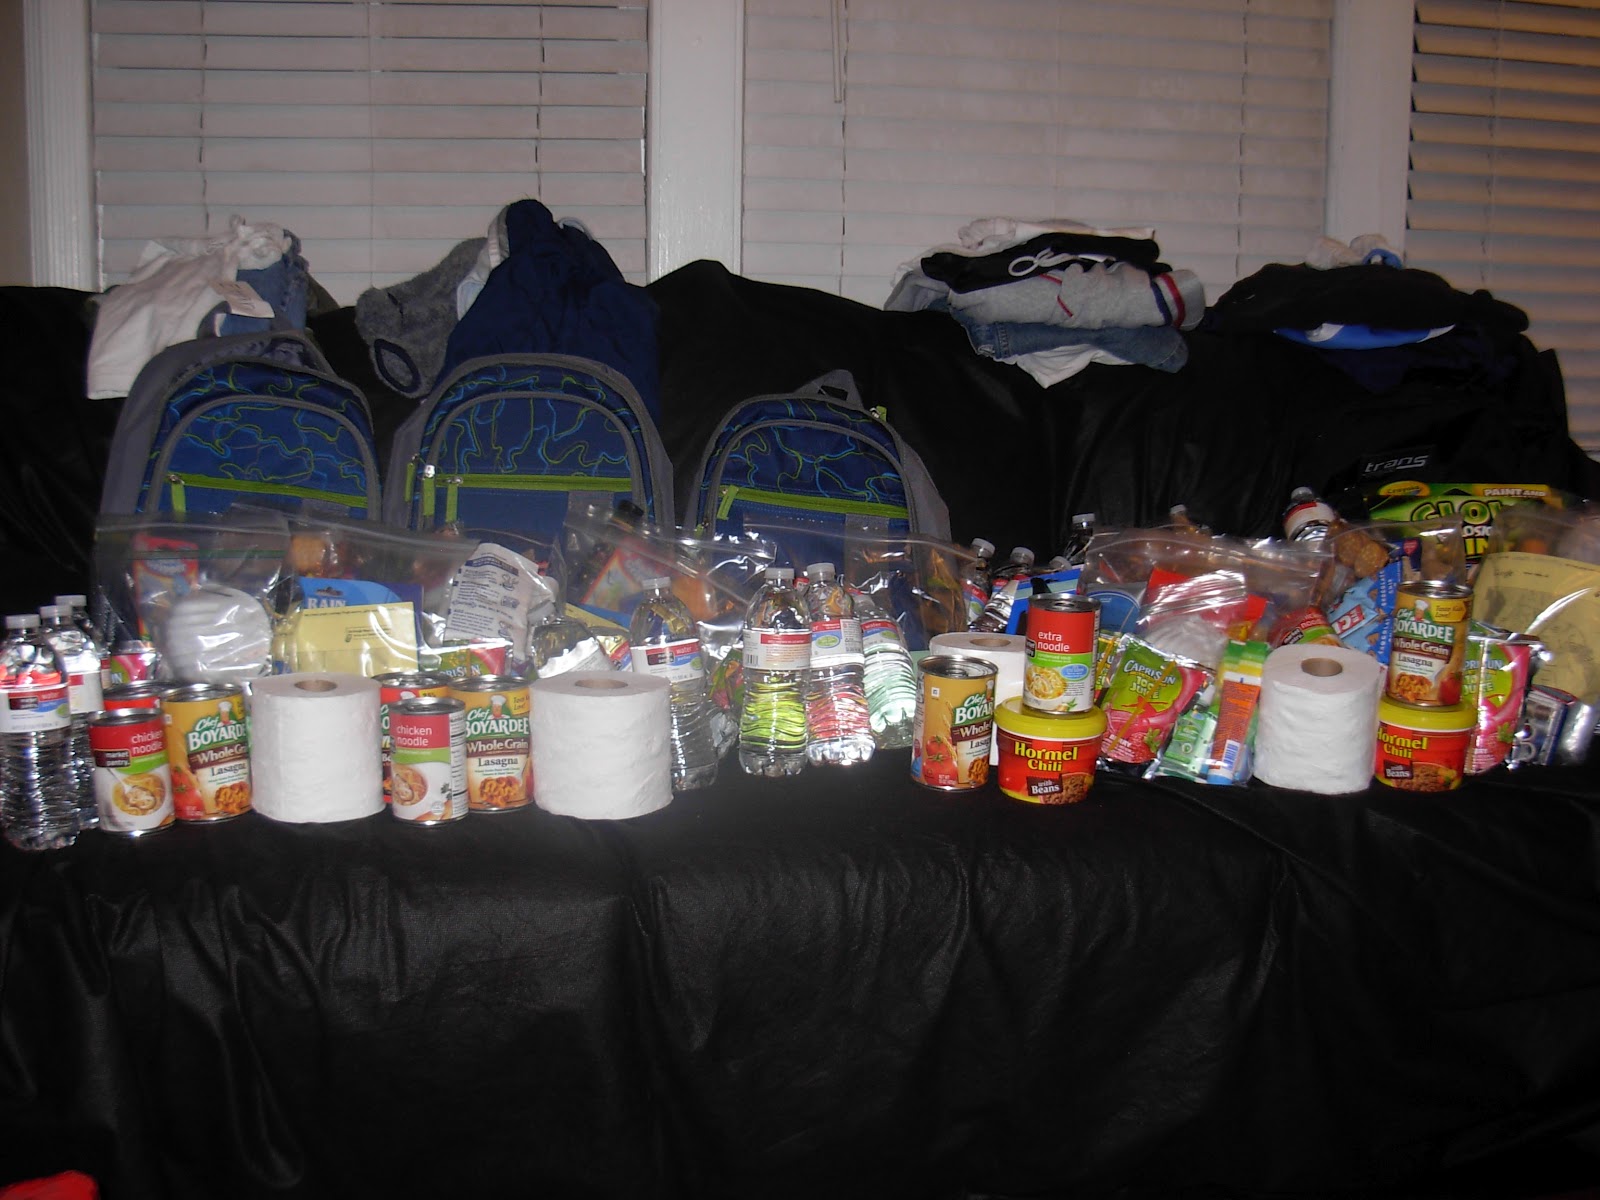
Each person got two food bags; one for meals, one for snacks. Breakfasts: 5 oatmeal packets. Lunches: One easy mac, two tuna packets. Dinner: Three cans. The only differences between the kids and adults are that the adults got chile instead of ravioli, and the kids got Cliff Kidz Bars that I got on clearance instead of full size ones.

Kids' miscellaneous bags: Toothbrush/paste, tissue, notepad, sunscreen, comb, hand sanitizer, mask, washcloth, map with important addresses and phone numbers.

It all just barely fit with a change of clothes and a roll of toilet paper. We will have to pack a separate bag with diapers and wipes for everyone.

And this is everything that baby #3 has so far. Toothbrush, washcloth, notepad (it was extra), juice (in case of dehydration). We'll work on that pack later.

For now I filled the rest with extra water and an activity for big brothers.

Here is my miscellaneous bag. It has meds for the family, sewing kit, aloe gel, a lighter, and can opener (all from the dollar store!) in addition to what the kids have. Hubby has the same one minus the meds, since he'll be getting the giant first aid kit in his bag.

Here is hubby's bag.

And here they are all packed up!

In our front closet, ready to go out the door.

I'll keep building them little by little, but it feels good to have something. Bring it on, nature. (No, just kidding. Please don't.)
Subscribe to:
Posts (Atom)